Wednesday, April 28, 2010

FRAME 002 GLUE UP, PART 2

So I had about two hours tonight to get down to the garage from 9pm until 11pm and get my frame glued and drying. I picked up where I left off last night and checked the condition of everything that dried. Looking good.

After getting everything glued together and placing some screws into key ribs and verticals, I then set about filling some of the gaps in the router work with wood putty. It's a little sloppy now, but I'll go back in tomorrow and Friday and sand it smooth and get it all cleaned up. So, here's some photos of the frame all glued up and puttied, drying.

Here's the front view:


Side View:


Back View


I think I'm pretty pleased with the way it came together. Still minor flaws here and there, and it can use a little sanding here and there to smooth out a few high spots around the ribs, but, overall very pleased!!

Next up, sanding a painting the frame. I know...I know...why paint the frame...it's just something I want to do. I'll get into reasons another time. I'm tired!!! More pictures of the frame to follow during painting.

Tuesday, April 27, 2010

FRAME 002 GLUE UP

Okay, set up the Base Plate, the Center Ring, the two Side Supports and the Top Ring and glued them up tonight. I then secured everything with wood screws. Gonna let everything sit until tomorrow. Checked on it all with a Carpenter's Square and it all looks good so far. Right now, it's all under weight. I'll snap photos tomorrow.

Monday, April 26, 2010

THINKING OUT LOUD

So, I've been contemplating how I'm going to glue this thing up by myself. I think what I'm going to do is glue the Base Plate, the two Side Supports and the Top Ring together, backed up by placing wood screws in at all the joins.


CAUTION
Don't forget to set the CENTER RING in place before putting the Top Ring on or there is no going back. Ah, and that reminds me, I think I still have to make the clearance cut for the coin slots too.


Once that has completely dried, I can then move on to gluing up the Verticals and Ribs.

Another note, DON'T USE GORILLA GLUE or other expanding glues. Plain old wood glue is best.

I'll try to take pictures as I assemble.

Okay, that's it for tonight. Just wanted to get those few thoughts down before I moved on.

FRAME NUMBER 002

Well, thanks to tips from Matt and a little more patience and understanding, I was able to finish cutting out all the new pieces. The uprights from Frame 001 were reused, as were the 3/4" side uprights and the shoulder wings.


I cut the new Upper Ring, the Base Plate and the Center Ring, along with all new Horizontal Ribs.


The result, a straight, square, non-leaning wooden frame! WOOOO-HOOOO!!!!!!!!!


Throughout the coming days, it'll be time to glue it up and clamp it down for drying. Gotta run to get some wood glue tonight.

Saturday, April 24, 2010

FRAME NUMBER TWO STATUS

No photos to upload yet, but I spent nearly 5 hours in the garage tonight. I got the new top and base rings completely cut out. I also started plotting the slots in the new center ring. Don't know how much time I'll have to work on it tomorrow, but it was really nice getting so much done today.

I just hope these new rings help solve my problem of the leaning frame. We'll see.

Friday, April 23, 2010

BODY DETAIL PARTS ARRIVAL

Got home at 1900 hours tonight and wasn't able to get any work done on my frame. Sheesh!!!!! BUT, there is a silver lining to all of this. My box of resin body detail parts arrived from Dark Jedi. These are way cool! I felt like a kid in a candy store and was REALLY disappointed that I couldn't go downstairs to the garage and start cutting up some more wood.

Well, I guess I'll start on it all tomorrow.

Here's some photos of my parts, straight out of the box.


1. The Dome Bumps


1A. The Dome Bumps on the back of a finished droid.


2. The Coin Slots and the Restraining Bolt


2A. Both items on a finished droid


3. The Charging Ports


4. Arms and Large Data Port (LDP)


4A. Same items on finished droid


5. All my new parts straight out of the box


Hey, what's that flickering way over there??? Could that be the start of a light at the end of a long tunnel? A long way to go, but he's slowly coming together!!!!!

CAN'T WAIT TO GET OFF WORK!

Clock watching! Trying to get un-burried from paperwork so I can head out on time and be home around 1500 today.

ARRRRGGGGHHHHH!!!!!

Maybe if I quit posting here, I'd get more done! :)

BODY DETAIL PARTS SHIPPED

Just heard from Keith! All my Body details shipped yesterday. Should have them shortly. WOO HOO!!!!

Thursday, April 22, 2010

WEEKEND FOCUS

Okay, the busy week is almost over! Didn't get any real WORK done on the frame this week, however, I did pick up my piece of 1/4" ply for the rib I didn't cut last time. That should allow me to make ALL the frame pieces this weekend. I'm actually hoping to start up tomorrow (Friday) because it's my "short" day at work. I should be home around 1500 hours.

I've got a 501st Troop coming up on May 1st in Folsom, so I'll be pulling out the Vader Suit and getting it prepared to make an appearance. Outside of that, it was a crappy week and I'm looking forward to seeing some warmer weather this weekend!

Keep ya posted!

Wednesday, April 21, 2010

CRAPPY WEATHER

Man, this rain sucks!!!!! I'm going through sawdust withdrawls! :)

Tuesday, April 20, 2010

BAD WEATHER

No work on the frame last night due to getting home late. Probably no work on it tonight due to the rainy weather. Last time I worked in the garage with the rain coming down, the plywood got wet from the wind blowing everything into the garage. We'll see though...I'm chompin' at the bit to get back to my frame!!!!!!

Monday, April 19, 2010

DOME DETAIL PARTS

These are the parts I ordered a few weeks ago. Posting here just for completeness sake.


A black Radar Eye Lens:


The Radar Eye itself


All of the Logic Display Surrounds


The 3 Holo Projectors (Only one is pictured here)


Once these parts arrive, I'll also get started on my dome.

BODY GREEBLIES (DETAIL PARTS)

Almost forgot...ordered the following in resin:

Dome Bumps


P.S.I. Flasher Housings Set


Octagon Port Set


Power Coupling Port Set


Vent Surrounds Set


Coin Slots


Utility Arms Set


Restraining Bolt


Large Data Port


I won't start ordering Leg Greeblies until I start on the legs themselves. For now, it'll be a couple weeks before I see these parts arrive, plus, I'm still awaiting all my dome parts I ordered a few weeks ago. That should be enough to keep me busy for quite a while. That...coupled with the frame, dome and skins and I'd say I have my hands full at the moment.

Sunday, April 18, 2010

RE-CUTTING THE FRAME

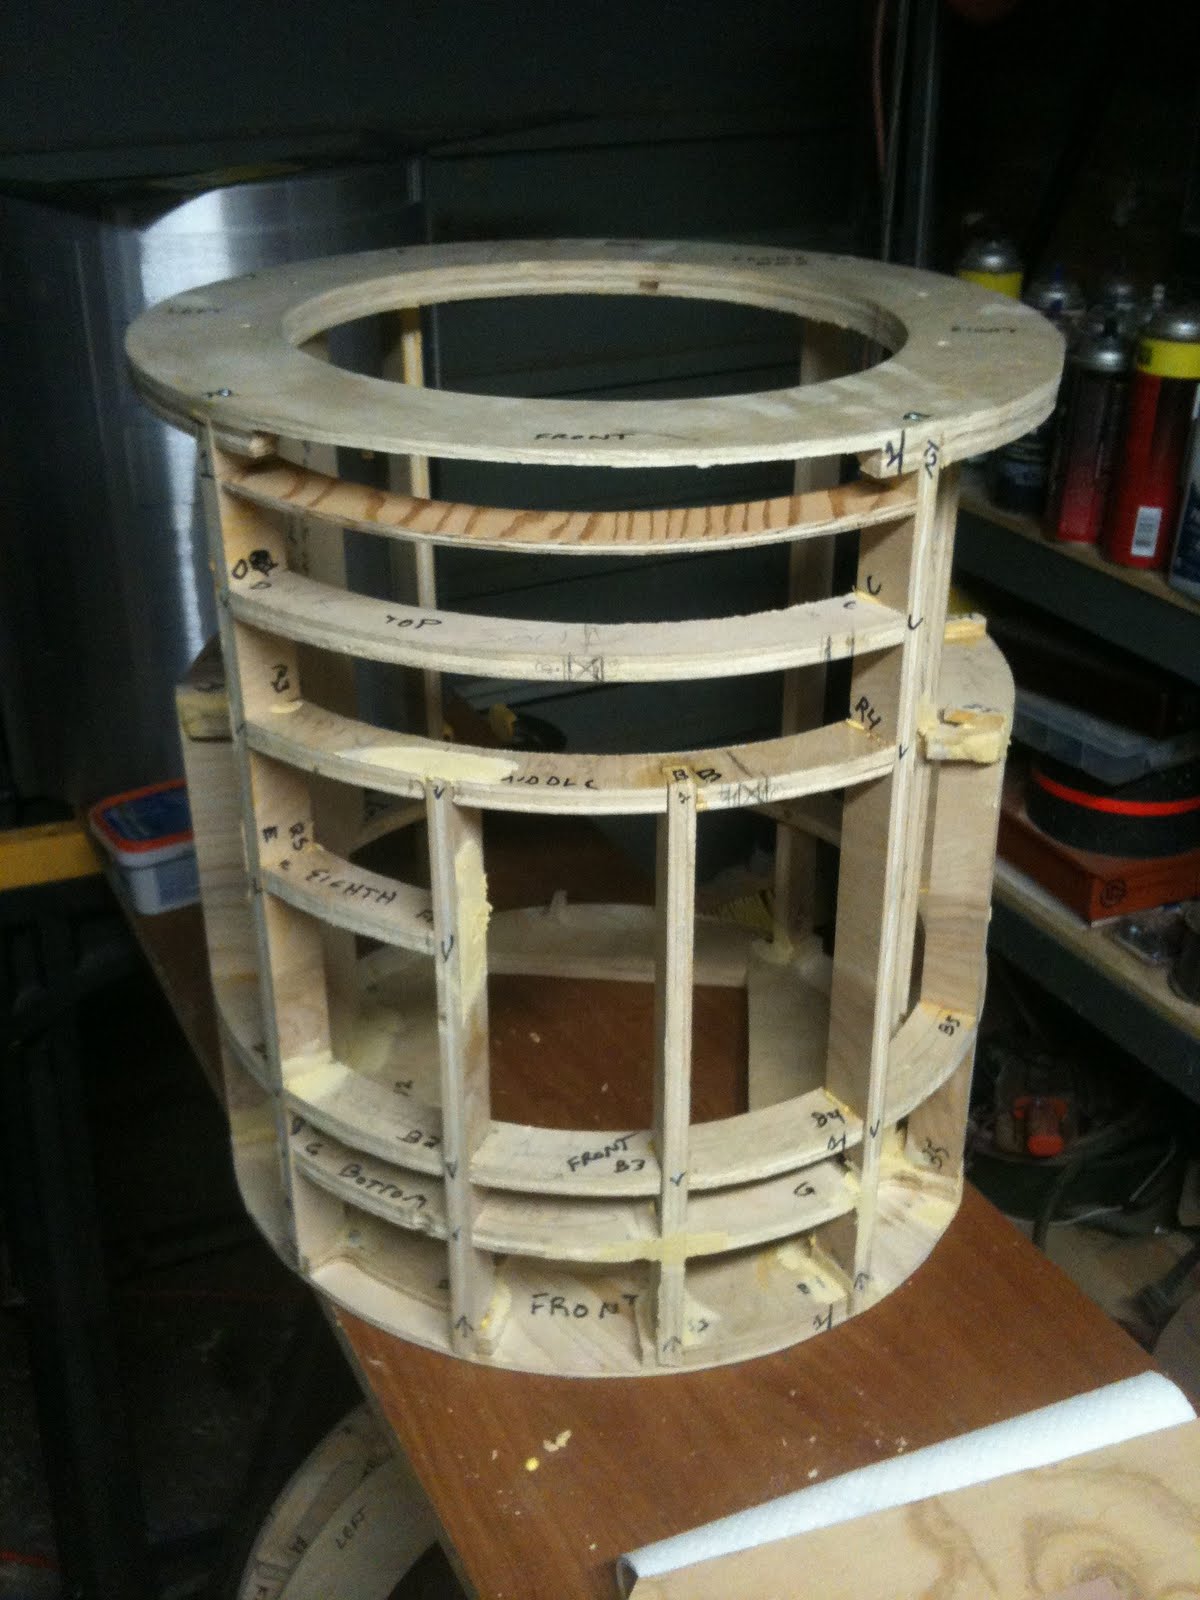
It's official! Now that I've assembled my first frame and see the mistakes, as well as understand how it all goes together, I'm tackling a second frame already. There are several measurements on the downloaded plans that are off, so I'm taking the time to really think these pieces through. I've made several changes already. In addition, I'm talking with Matt and taking his adjustments into consideration as well. Looks like he and I made the same changes.


While I haven't started cutting yet, here's some of the tips I've come up with. If this frame turns out great, others may want to keep these tips in mind.


1. Whatever method you use to draw your 18" circles, make sure all three are EXACTLY the same size. Draw them all at the same time, with the same compass. I drew out two on the 3/4" ply and two on the 1/2" ply. The reason for the extra 1/2" circle is to use it to make the horizontal ribs.
2. For the money I spent on the stainless steel protractor from Lowe's, don't bother. I ended up going to Office Depot and purchased this protractor for drafting. GET ONE! For under $5.00, this is the way to go.

Order one or pick it up at your local Office Depot
3. When ready to cut your circles, cut them all at once, using the same jig. Make sure your jig solidly retains its measurement. I'll be cutting mine tomorrow or Tuesday.


So, I laid out the diagram for all 3 of my new circles, plus my extra ring. I laid out all the angles and slots for the top ring and began laying out the angles for the bottom ring. Having a project calculator handy to convert from decimals to fractions is making things incredibly smooth. I can't remember if I talked about this earlier in my blog or not. I purchased an iPhone app called "Carpenter's Helper Pro". I can enter the decimal (7.41 for example) and press the inches button twice and it tells me 7 7/16" is the closest fraction measurement. As long as I'm consistent in using it for ALL my measurements, things should be fine.


As for the difference between my small stainless steel protractor I bought at Lowe's vs. the plastic one from Office Depot, I can already tell my angles were off using the one from Lowe's. In some cases, by as much as 3/4". Again, as long as I'm consistent in using the new protractor, I think things are going to come out much MUCH better.


So, that's my latest updates. Too late to do any cutting tonight, so I'll make the noise starting tomorrow. I plan on using my Rotozip and the Circle Cutting Tool attached to it to cut the discs. WISH ME LUCK!!!!

Saturday, April 17, 2010

FRAME "WONKINESS"

Today, I noticed something interesting. I was adjusting and re-cutting the horizontal ribs when I noticed the frame was "leaning" forward. Not by much, but enough to be visible to the naked eye. When looking at the frame straight on, it was fine. When looking at it from the side, you could tell it was leaning forward. So, I backed all the screws out and started adjusting some things. Nothing I did seemed to take ALL of the lean out. In the end, I called Matt McCormick and he said to bring it over. Within a few minutes, we determined my top, middle and bottom rings were different sizes. Not be much (probably about 1/8" at the most, but enough to introduce some lean when combined with other factors. Additionally, we noticed my slots in the rings weren't identical. They were close, but off. I took it all home, clamped it all down and took a hard look at the rings. The result, I'm going to re-cut the rings. I think the vertical struts are okay. I did a bit of file clean-up on the verticals tonight. I'll check-up on their measurements tomorrow. I'm also going to cut a fourth 1/2" ring (identical to the middle ring), however, it won't have any slots cut in it. From that ring, I'll create the horizontal rings and I should be able to get the clearances on the ribs pretty tight. So, I'm done for the night. Tomorrow starts the re-cut of the rings.

Friday, April 16, 2010

LOCKING DOWN THE FRAME

So, today, I spent the day pre-drilling holes for all my wood screws to tighten down the frame. No glue was applied at this stage.

In tightening everything down, a few areas I was worried about resolved themselves, but a few NEW problems crept in.

First off, there's a piece calle an Eighth Ring. It just isn't wide enough to span the two adjacent vertical uprights.

I went back into the plans and attempted to re-draw the piece, but couldn't get the measurements right. The new one is even SHORTER! I'm doing something wrong!

Here's a few more shots of the "too short" ring (rib). The first photo is looking down into the frame and the other is from the front side.


If I can just get these eighth and quarter rings cut correctly, I'll be ready to glue the frame together. It looks pretty good other than these small issues:


If I need to re-cut them all, I guess I will.

Wednesday, April 14, 2010

FINE TUNING JOINTS

Tonight, I began the tedious process of fine tuning the joints in the frame. I only had about 45 minutes to an hour to work, so I was only able to work on 5 joints. Here's a photo of how they are turning out now that I'm extending the slots by approximately 3/8".

Now, I'm much more pleased with the joints. I'll keep working on all of them until they're all smooth. Then, it will be time to start pre-drilling screw holes and planning out the gluing and clamping process.

Tuesday, April 13, 2010

ROUGH FRAME ASSEMBLY TEST

Okay, I must say I'm a bit concerned about tollerances and the precise level of the angles from cutting this frame out by hand. I did a test fit tonight and a LOT of it is highly dependent upon getting all the pieces in the right positions and fully "seated" against one another. I don't have the clearances down to where I need them yet and was unable to get all the ribs in place, but it looks like everything is basically in the right place.

I'll keep working on cleaning up the cuts and trying to get the fit a little bit closer.


Another problem I had was in unpacking my Sherrell Skins. I discovered the bottom of one of the outer skins became detached from itself (pictured below) and I'm wondering if it's going to cause me problems later down the road. If I'm correct, it will not because the skins will be bonded together and attached to the frame, so I think I'm okay.


So, I proceeded to test fit the skins around the frame and I believe it's pretty darn close. It may need some more sanding around the rings, but I'm not sure until I get all the uprights and ribs to join at a flat plane.


I couldn't resist setting the dome on top of it all!


Another concern I have is the height of the frame vs. the height of the skins. The frame is coming in about 1/16" under 19 3/8", while the skins are a nearly perfect 19 3/8".


I'm leaning towards everything being okay. By the time I clamp it all down, glue it and place some strategic nails and/or screws into the frame, I think the tolerances will become a lot better. But I do believe I'm in the ballpark. Only time will tell right now.


Worse case scenario: Start another frame...I've got enought wood.

Sunday, April 11, 2010

WHAT A MESS!!!!!

I didn't get anywhere near the amount of work done this weekend like I had planned. However, I was able to do some routing this afternoon on the rings. Routing sure makes a COMPLETE mess!!!!


Now what I need to do is set up the new Dado blade and go back over the verticals (uprights) and make sure I cut the slots to 1 1/8" or 1 1/4" depending on how they fit with the ribs (partial rings).
I think the pockets (above) turned out pretty good. I'm getting pretty close to being ready to test fit everything together.

Friday, April 9, 2010

New Tools

Didn't get home in time to do any noisy work in the garage tonight, but I ended up stopping by Lowe's to look at a few things to make life easier. I picked up a dado blade set, a new 1/2 inch Straight Router bit, some new safety goggles to keep the sawdust out of my eyes and some new ear plugs so I can quit using my Metal Detector Headphones as hearing protection!

I also replaced my Jigsaw with a new Black & Decker and a new Halogen portable shoplight. I'm holding off on the .25 inch MDF in favor of .25 inch plywood. Called a friend who already has some plywood and I'll swing by his house to pick it up.

One of the other things I hadn't thought of was using my circle attachment for my ROTOZIP to cut the rings. I hadn't used my Rotozip in several years and forgot all about it sitting up in a cabinet. Anyway, I may make another frame since I have extra plywood and see which one turns out the best. I'm enjoying all this!

Half Inch Slots

So, I couldn't sleep and ended up wandering into the garage last night around midnight. Test fitting a few of the roughed in slots I cut, I discovered they aren't deep enough. I then checked the depth I cut them to and they came up to a half inch as depicted in the plans. After a bit of thought, I determined it was because the plans were updated to reflect 1.25 inch Verticals and originally (according to the forums) they were designed for 1 inch verticals. So, looks like tonight and through the weekend I'll be working on making those cuts deeper, a little bit at a time. In addition, I plan on running by Lowe's on the way home from work today and seeing if they have the small piece of 1/4 inch MDF I need to cut that last frame piece.


I'd be tempted to just go ahead and use 1/2 inch ply to make the final piece, but, not being familiar with how the rest of the droid goes together, I'll stick with what the plans depict.


Hmmmm....I think I'll shoot Matthew an e-mail and ask him if his plans would allow me to substitute the 1/2 ply for the MDF. Not really saving any money in the big final picture (just a few dollars), but more about saving time and trips to the store vs. just using what I have on hand. I think the MDF is the piece that sits directly below the LDP (Large Data Port).


More to follow.....

Thursday, April 8, 2010

Gettin' The Groove

Spent about an hour tonight roughing out the slots in the verticals and ribs...haven't started on the upper, lower or center rings yet.

Tomorrow, I hope to start on the rest of the slots and break out the router. I also need to find a sheet of quarter inch MDF for one of the "ribs". I hate to buy a whole sheet for that one little piece...but...we'll see.


Once I'm done cutting everything up, it'll be time for rough assembly, sanding, filing and testing everything out before final assembly.

Wednesday, April 7, 2010

Frame, Frame and More Frame

Today, I cut out the Quarter Ring Solids, the Quarter Ring Cut and the Eighth Ring. I also set up the Table Saw and ripped the 10 verticals.


One piece of advice to those thinking about building a wooden frame. Make sure you have a table saw available!!!! It makes ripping the verticals SO much easier.


Tomorrow...I'll start adding the cuts to the verticals.

Tuesday, April 6, 2010

More Frame Pieces Cut Out

Spent two more hours in the garage tonight. First up was cutting out the Center Ring, followed by the shoulder wings and the Side Uprights.

Above, the Center Ring drawn out


Much like the previous two rings, I cut out a square around the drawn circle, nailed down the center point and rotated the whole thing while holding onto my Jigsaw.


I then drilled a hole near the inner cut line which I utilized to start my jigsaw cut.


The Result: A nice Center Ring


I then drew the two Shoulder Rings and cut them out

This one is a little different than the other one...but I only took this photo.


Lastly, for tonight, my frame progress thus far. Included in the photo, you can see the two Side Uprights. The only thing I haven't done to these pieces is cut out some of the pockets and grooves, which I'll begin doing once I have more pieces cut out and can start test fitting and verifying measurements. So far, I'm pretty happy. It's been many years since I've worked this much with wood, but I'm loving it. My mistakes aren't too bad (minor blade slips here and there), but overall, I'm pleased!