Monday, December 10, 2012

ANOTHER EYE FOR TERMINATOR

I'm still learning alot as I go; however, here is another eye I made for the Terminator Bust:


I happened to watch some very complex process via the Stan Winston School on creating artifical eyes and during one of the videos, it was pointed out that 5 min epoxy could be used to created that glossy look over the eye. I tried it, and it worked! I love how glossy it is! Now to work on painting again. I'm still not happy with this eye just yet. Stay Tooned!

Tuesday, November 20, 2012

THE HUMAN EYE FOR TERMINATOR

In my early 20's, I used to hand paint human eyes to exercise my make-up FX skills. Well, instead of spending upwards of $80.00 on glass eyes for my Terminator head, I sat down last night and painted this one. Not perfect, but it's gettin there. These are the photos of the makeshift pop can holder I made so I could spray it with the multiple layers of clear acrylic. Essentially, you hold the can upside down and spray the eye. This keeps the layers of acrylic thicker at the iris and pupil and gives it that wet, thick look adding depth. A few more coats and I think I'll be happy with it. I'll probably do one more and try to photo match Arnold's eye more closely. Yeah, I know ping pong balls are the wrong size, but you really can't tell once it's in the head itself. The old method I used to do would be to paint a layer and put a thick layer of acrylic on. Then, paint another layer and put another thick layer of acrylic on...repeating the process until the iris looked the way I wanted it to. Didn't do it on this one, but I probably will on the next one.


Monday, November 19, 2012

T-800 WORK

Had a brief few minutes last night to do some trim work on my Schwarzenegger Casting. Drilled out the left eye and got the right Cyborg eye trimmed up and ready to install. I also worked a bit on the jaw piston and began sanding the seam lines and cleaning up the casting flash. I hope to start some detail bondo work this weekend so I can start planning on paint. Stay tuned...I'll be back.

Thursday, November 8, 2012

ARNOLD T-800 STAGE FIVE

Scored my T2 Head!!! Now to plan on painting and adding light and a glass eye.

Thursday, October 25, 2012

INDIANA JONES IDOL ADDED TO COLLECTION

Okay, I've wanted one of these since the mid-90's!

This one is solid gleaming metal and made by a local prop builder and friend!
It takes him a few months to make them and should be available sometime after the New Year (Jan or Feb 2013)

Woo hoo!!!!!!!

Wednesday, October 17, 2012

TERMINATOR BUST

Adding this new piece to my collection!

To paint, or not to paint? That is the question!

Sunday, October 7, 2012

STAR WARS READS DAY 2012

Saturday, Oct 6th, 2012, Citrus Heights Barnes & Noble Book Store.

Friday, October 5, 2012

ME AND MY WORK

This has been a really cool couple of years! Wonder where this will all take me next!

In this shot, everything is built, assembled and painted by me, with the exception of Vader, the classic Stormtrooper and the Shock Trooper.

Tuesday, September 25, 2012

BOBA FETT #2

So I've finally started work on my ASOK Cold Cast Aluminum Fett Pride Helmet.

I broke my own rules on this one and started working on it before I photographed anything...GRRRRR!!! Sorry about that. What is NOT photographed below is the cutting and trimming of all the excess flashing and resin and the trimming of the visor area.

I also started buffing the dome of the helmet before I realized I better start taking photographs.

So how does resin come out looking so metalic? It's the buffing and the metal powder in the resin. You see, there is aluminum powder in the resin which is used to pour into the mold. After everything is cured, you use some .000 steel wool to buff the resin and it comes out looking like the photos below. I tried to also photograph what it looks like before it goes from dull gray to brushed aluminum! I was very pleased with the results!

Now, this is not a perfect casting and there are flaws in the surface of the helmet. That's why this is what is known as a "B" pull helmet.
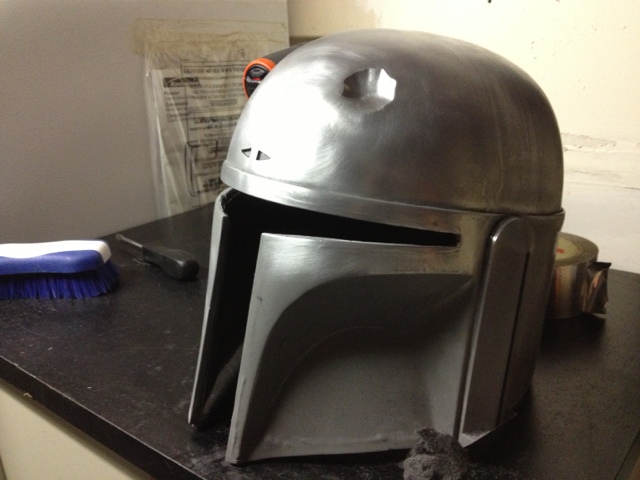
Once I remembered I needed to start photographing the helmet, I stopped. Here's a shot of the partially buffed helmet. The top dome is nearly completed. The bottom cheek on the pictured left side has not been started. You can see the difference in color.
The above four photographs are more pre-buffed resin

And now, what it looks like after all the buffing is nearly completed.

This will save me a LOT of time later when it comes time to paint the helmet. I won't have to primer the whole thing, find a silver paint and paint it, then mask off the areas that will look like exposed metal and paint over all that...instead, having the cold cast aluminum will eliminate two layers of paint. That will leave about 6 layers to go for the different colors and weathering.
It also prevents a problem I had on the first Boba Fett Helmet with the final layers of paint not wanting to adhere to the silver metallic paint. (A common problem)