Monday, November 1, 2010

HAPPY HALLOWEEN


Well, today (Halloween) was my birthday and I spent it with my incredibly BEAUTIFUL wife and awesome son! Here's some photos of his custom Stormtrooper (Sandtrooper Hybrid) which I built out of craft foam from Michaels Arts & Crafts. He was wearing my Master Replicas CE Stormtrooper Helmet and carrying my resin modified E-11 Blaster. I couldn't resist suiting up and accompanying him on his Trick-or-treat route. He scored BIG TIME for the candy this year! Way to go son!


HAPPY HALLOWEEN EVERYONE!

Friday, October 15, 2010

A FEW MORE PHOTOS FROM TURTLE BAY

Taken by friends and visitors, here's a few more photos from the Turtle Bay Visit last weekend.


Monday, October 11, 2010

501st VADER APPEARANCE

Saturday, October 9th, 2010, myself and several members of the 501st Legion, Central California Garrison made an appearance at the Turtle Bay Exhibition Park and Museum for the Out of This World Exhibit.

This video was shot by a museum employee and has been edited down to about 5 minutes. Nothing fancy mind you:

Monday, October 4, 2010

A MONTH SINCE MY LAST POST

Life has been keeping me pretty busy, but I haven't been ignoring my projects. Here's a few quick updates.

1) Made another appearance as Vader at the Sacramento Science Fiction and Horror Convention on Sep 25th and 26th. Good crowds and a great time! Had the pleasure of escorting Star Wars Veteran Actor Billy Dee Williams (Lando Callrisian) into the hall to sign autographs.

I took the suit off before I could pose next to him in costume, but here's a few shots from the event.

This is a shot of our 501st Table which greets fans as they approach our area. The Episode II Clone Trooper Helmet on the far left side of the table is the one I just finished, along with the Episode III Clone Trooper Helmet that has the Bondo all over it, sitting right next to it.


Another shot of our table and the helmets.


A pic of myself and my son standing together.


One of my fellow 501st Troopers (Sterling) and his girl.


Billy Dee Williams signing autographs for the fans.

Next update, another project has arrived! I received a Sgt Fang Boba Fett cast today, and will be working on it slowly.


The resin cast straight out of the box.


After a little bit of work and removing the visor area. Long way to go yet!

On another note, still a long way to go yet on the Episode III Clone. New pictures to follow this week, I hope!

On the way in the near future, a Clone Pilot helmet and two more Episode II Clone Helmets.

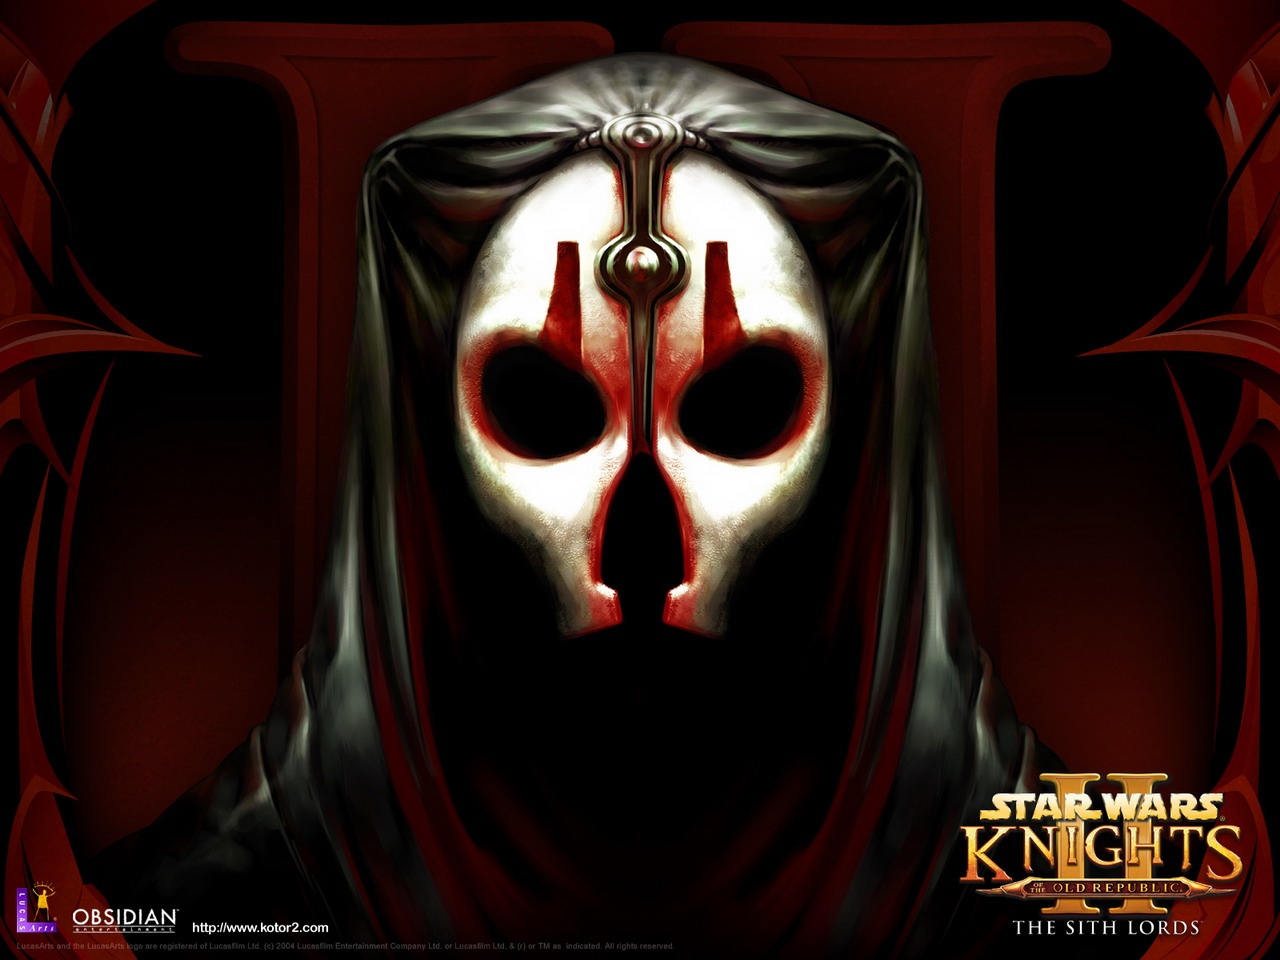
I also managed to obtain a Darth Nihilus mask from a friend. It's fiberglass and unfinished. Here's what it will look like when it's done:


Thanks Scott!!!

No R2 work this past month...been too busy with work and the little time I got to spend on my Clone Helmets. Hope to get back to some R2 work in a coming weekend before the weather starts getting too cold to do anything in my garage. :)

Til' next time!

Sunday, August 22, 2010

CLONE TROOPER ARMOR WORK (HELMET)

Been away from my garage for a little over a week! Going through R2 withdrawls, but, I've been too busy to think about him. I did find a very short amount of time this last weekend to clean up my Episode II Clone Trooper Grunt Helmet and get the paint work started on it.

First up, I used some Magic Sculp to create a nice thick layer around the base of the Neck Ring. After that set up, I sanded it smooth and drilled the holes into the lip in order to embed the magnets.


I also repeated that process for the base of the helmet.


This allowed the two pieces to come together quite strongly. I used rare earth magnets, 1/4 inch in diamter to embed in the edges (8 on the ring and 8 on the helmet). They were Super-Glued in place. I originally tried Epoxy (E6000), but it didn't hold 'em in place. They just pulled free! The Super-Glue held fantastic!!


After all of that, I coated the inside of the helmet with Black Plasti-Dip Tool Coating (Sorry, no picture of that process). Afterwards, I masked off the areas I didn't want affected by the primer coat and sprayed two coats of primer.


Then came the Satin White coats.


Next up, I'll be adding some of the other color details...grey trim around the ear and back of the head, black brow trim, black chin greeblie, etc. I'll also have to track down the Visor Material to place in the front. (You can see the black interior in this picture that I was talking about above)


I also managed to protect the area where this one is identeifed as Clone6 (C6) Helmet #24 from DWD, 2010. This is a shot taken by looking up into the helmet from underneath. I had the helmet on a make-shift stand which I hastily built out of some scrap wood from R2.


I'm liking the progress so far! Gotta get some window screen for the teeth area, and paint the teeth area grey as well. That's it for now!

Sunday, August 8, 2010

LEG MOUNTING HARDWARE


Went to Lowes tonight to pickup the Tnuts which Matt and others have used to mount the legs to the frame. Holy Guacamole Batman! $3.35 EACH and I need EIGHT of them!!!!! NO WAY!!!!

So, I went to OSH and found them at $1.14 per package of two. MUCH better! So that's what I did tonight. Nothing else.

They'll be used on the 3/4" layer of each leg. The bolts will run from inside the frame, through the shoulder hubs and into each leg (4 bolts on each leg).

Thursday, August 5, 2010

DOME SANDING

I didn't have a lot of time to work on anything tonight, and didn't get near the legs, so I spent about 20 minutes sanding the dome. Long way to go. No photos to show tonight...hopefully I'll make some progress this weekend. We'll see.

Tuesday, August 3, 2010

LEG PROGRESS


Today, I spent time routing out the pockets under the shoulders (THAT SUCKED!!!!) and cleaning them up with a wood chisel (REALLY SUCKED!!!!) But, I made progress. I also cut out the center of the 3/4" leg layer.


Next up, I need to figure out the dimensions of the shoulder holes and start planning the cutting of the Center Leg (even though I ordered one from JAG). Looks like Matt McCormick's Blog has quite a bit of info about the center leg and how he put it all together.

Monday, August 2, 2010

MORE LEG WORK


I didn't have a whole lot of time to work on R2 tonight, so I slowed down and made a few cuts on some of the leg pieces. I left about 1/16th of an inch extra on each of the cuts because it was getting a bit dark and I wanted to make sure I didn't over cut. I can always file and sand down the extra later once all the layers are attached together.


I think the layers are looking pretty good on the first leg. This is the stack of layers I used with one small difference...in looking at the leg plans, I used one piece of 1/2" on the bottom right piece instead of the 1/4" shown in the diagram. When I compared everything to the club blueprints, it measured out correctly, so that's what I went with.

I still need to cut the channel from the 3/4 inch layer, but I'm not in a big hurry for that. Plus, I still need to dig out the shoulder pockets. All pending! :)

COUPLE OF PICS


THE CCG 501st CREW

Here's a few shots of me and the guys during the Weird Al show last night. Obviously, I didn't take any of these shots, but thanks to all our friends who did and are kind enough to let us use them.

There I am!


Look!!! It's the bobbleheads! Backstage rehearsal.


Havin' fun with the crowds backstage.


A shot with us and Weird Al! What a great time! Hopefully, some video to post soon!

ON STAGE WITH WEIRD AL YANKOVIC


I had the honor of making another Vader appearance with the 501st last night. This one was at the California State Fair, on stage with Weird Al Yankovic! Had a great time! Al was a gracious entertainer and very social with everyone!

Here's a video, but the audio is a little blown out because the camera was so close to the sound system.
CA STATE FAIR VIDEO

Sunday, August 1, 2010

VADER APPEARANCE


I'll be making a 501st Vader appearance at the California State Fair tonight, onstage, with Weird Al Yankovic during the final act of his show!

Hopefully pictures and video to follow!

Saturday, July 31, 2010

MORE LEG WORK & A NEW HELMET!

Got some more time in the garage tonight to cut out the Ankle Pieces and another 1/8" layer for the legs. So far so good! Not much to show as far as pictures. I'll try and get some photos of the leg stacks tomorrow.

I was also fortunate enough to have my Clone 6 Episode III Bucket dropped off today!!! Now I can make my Shock Trooper!!!


Just like the Episode II Grunt Bucket, this one is unfinished and will take quite a bit of work to make it presentable, but it'll be worth it.

THANKS DARREN!

Friday, July 30, 2010

LEGS TAKING SHAPE


After spending the time to cleanup my MDF leg template, I tackled my first set of leg layers. I'm REALLY pleased with how they came out!

I followed in the footsteps of Victor Franco and a few others before me, creating a good 1/4" MDF template. Once completed, I set up my flush trim router bit. I then used wood screws to attach the template to the surface of my wood blanks. I rough cut the shape with my jigsaw (to about 1/8" around the template) and then used the table router to trim the final edge.


Looking pretty good. I still need to go back and look at the plans and figure out what final cuts I need to make off these pieces, in addition to a few smaller 1/2" pieces and 1/4" pieces to finish off the bottom of the legs.

Tuesday, July 27, 2010

STARTED WORKING ON THE LEGS!!!


Tonight, I was able to take my printed leg templates and the 1/4" MDF I got from Home Depot and cut out my Leg Template. I think I'm going to make another one tomorrow just to see if I can improve on a few small errors. Otherwise, I think I'm ready to start cutting out the leg layers. I cut out the four pieces of 1/2" ply, along with the two pieces of 3/4" ply which will be used to cut the final layers.

Lastly, I hung the full-size leg prints on the shelf next to my work area in the garage...starting to look like a droid factory down there! Stay tooned!