
...and finally the weathering process has begun! I failed to photograph two processes on this helmet. The first, installing the rubber door trim around the edges of the helmet. Pretty simple to do, just cut to length and install. In this photo, you can see the ends of the door trim being held against the edge of the helmet with green painters tape because the very ends were popping off the plastic for a short time.
Secondly, I forgot to photograph the installation of the visor...again, really simple. Cut some industrial strength, sticky back velcro to the top front edge of the visor itself and the inside upper edge of the helmet by the forehead. Stick the two together and "tadaaaa".
Still to come, installation of the chin cup/strap and the microphone tip.
For now, let's talk about weathering. The tutorial videos over at http://www.goldenarmor.com were a big help! He covers a lot of information in three fairly short videos about assembling and painting these helmets. Some good tips. My methods were a little different, but I picked up a few good things. One of the most important things was the "wash" process to give it the weathered look. Some black acrylic paint, diluted in water and brushed all over the helmet. Let it sit 5 to 10 minutes and then start dabbing and wiping it off. It may take multiple layers. In between each layer, you need to spray it with matte finish clear coat. The photos below are after one coat. I'll be dabbing and washing one or two more coats tonight.
The acrylic paint I'm using is black from "Apple Barrel" and is .52 cents per bottle at Walmart in the Arts & Crafts (Crayons) department. At least, that's where it is in MY Walmart.
On to the photos:


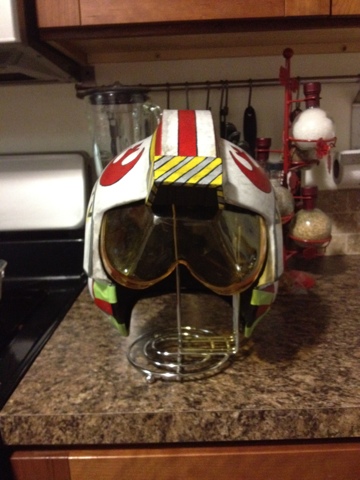


Not much to say, other than...I LIKE IT!!!! :)
No comments:
Post a Comment