Tuesday, September 25, 2012

BOBA FETT #2

So I've finally started work on my ASOK Cold Cast Aluminum Fett Pride Helmet.

I broke my own rules on this one and started working on it before I photographed anything...GRRRRR!!! Sorry about that. What is NOT photographed below is the cutting and trimming of all the excess flashing and resin and the trimming of the visor area.

I also started buffing the dome of the helmet before I realized I better start taking photographs.

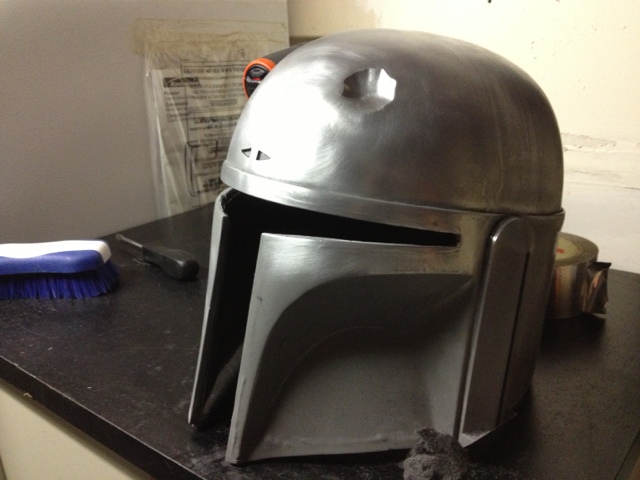
So how does resin come out looking so metalic? It's the buffing and the metal powder in the resin. You see, there is aluminum powder in the resin which is used to pour into the mold. After everything is cured, you use some .000 steel wool to buff the resin and it comes out looking like the photos below. I tried to also photograph what it looks like before it goes from dull gray to brushed aluminum! I was very pleased with the results!

Now, this is not a perfect casting and there are flaws in the surface of the helmet. That's why this is what is known as a "B" pull helmet.
Once I remembered I needed to start photographing the helmet, I stopped. Here's a shot of the partially buffed helmet. The top dome is nearly completed. The bottom cheek on the pictured left side has not been started. You can see the difference in color.
The above four photographs are more pre-buffed resin

And now, what it looks like after all the buffing is nearly completed.

This will save me a LOT of time later when it comes time to paint the helmet. I won't have to primer the whole thing, find a silver paint and paint it, then mask off the areas that will look like exposed metal and paint over all that...instead, having the cold cast aluminum will eliminate two layers of paint. That will leave about 6 layers to go for the different colors and weathering.
It also prevents a problem I had on the first Boba Fett Helmet with the final layers of paint not wanting to adhere to the silver metallic paint. (A common problem)

X-WING HELMET #2

Got some more work done on the X-Wing Pilot Helmet (#2).

Again, everything symbol wise is being hand painted. The photos are uploading from my phone and may not be in the order I shot them. Enjoy!

Tuesday, September 18, 2012

THE TROUBLE WITH ASTROMECHS (R2'S LATEST PROGRESS)

So, I took a week "Staycation" from work. Needed to decompress from some of the daily stresses. It was a great opportunity to spend some catch-up time with R2. To start off with the simple stuff, I wanted to paint the Holoprojectors on the Dome to look like the ANH R2. So, a few coats of black paint and the job was done!
Front Holoprojector trimmed in flat black
Rear Holoprojector trimmed in flat black

The next challenge was getting the foot shells ready to be installed. I spent some time with them and decided to mount the middle shell first. I stood on the shells with my body weight and they held me just fine. In stalled the shell onto the middle leg and then braced up the outer legs for proper height. After about two minutes on his center foot, the shell started splitting and cracking!

I'm lookin' a bit ruff here cuz it was a LONG day. I'm covered in Resin Dust, Fiberglass Dust, Aluminum Dust and paint!

I'm no longer going to risk something I've spent all these years and money on to plastic feet and questionable pieces. R2's feet will now either be steel or thick aluminum (in the near future.) I'm working those details out. Soooooo....back to the drawing board on the feet.

Tuesday, September 11, 2012

CAPTAIN REX IN PROGRESS

Well, after studying photos, I had to redo some of my son's Capt Rex Helmet. It's coming together pretty well though. I think I may thicken the designs on the forehead a bit, and I need a darker mustard color yellow for the kill stripes. Gettin' there!

Friday, September 7, 2012

R2's MIDDLE FOOT SHELL

I'm gonna say this one is ready for paint! ;)

I also got to paint some of the silver details on his leg Booster Covers and the recessed grooved areas of his Radar Eye.

Wednesday, September 5, 2012

R2'S THREE FOOT SHELLS

Wow! I'm actually starting to see some light at the end of this tunnel! I still want to bondo, sand, prime and paint them, but they actually are starting to look like R2's feet!!

Even though they are only shells (they support no weight because the internal metal motor mounts do that) they still have to be reasonably sturdy, so I'll be fiberglassing the insides.

Monday, September 3, 2012

R2 FOOT SHELLS

Working on R2's foot shells. Shell number 1 assembly complete. Still have to do a bunch of sanding, bondo, reinforcement and painting. But it's coming along nicely. It fits the motor holders nicely.